Tuesday, February 26, 2008

First Sourdough Bread...Blah

Note: I'm having trouble with images. I'll get them up ASAP.

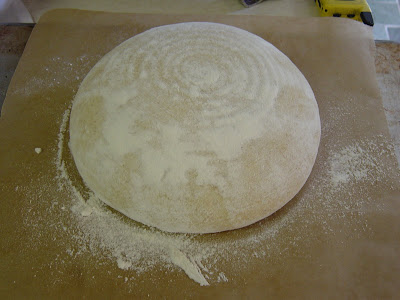
I’ve had a bad taste in my mouth (quite literally) since I baked my first sourdough boules, and that’s why Ihaven’t blogged in a while. I followed the basic country white recipe from Nancy Silverton’s book. I was unimpressed with the first rise, but the bread seemed to proof well enough in the basket.


Nevertheless, I put the boule in a 500F oven, then turned it down to 400F after 5 minutes. I misted the oven during the first five minutes as well.


I guess my cuts in the top were not sufficient, because the loaf split in a couple of places. Also, it smelled like burning – because it was. Check out the bottom. I baked it for 35 minutes.


I did let it rest for quite a while (maybe a couple of hours). The interior didn’t have irregular holes and had a sort of dense texture. I actually made two boules and the second was worse than the first. Sad. Also, the crust was very thick and did taste a little burnt. Finally, the bread was actually kind of dry. It just wasn’t something I really wanted to eat.

But I think I know what one major problem was:

This weekend, I made a non-sourdough white bread. It turned out great! It was really tasty and had a great texture. Not too crusty, but that was okay. Now, I think this was useful for my sourdough because although my oven was at the right temperatures (500F, then 400F just like the sourdough), the bread cooked in 15 minutes less time than the recipe said (30 mins instead of 45 mins). I measured it with my new thermapen – the recipe recommended a temperature of 210F. I actually took the bread out at 205F, and was not disappointed. It did continue to cook.

So I think this weekend I’m going to try to bake the sourdough again. I need to make sure my starter is really going strong and this time, I’m going to take the temperature of my sourdough after half the cooking time. If not, I’m going to make my other bread again and hope to have photos either way.

Wednesday, February 13, 2008

Friday Night Dinner: Homemade Pizzas!

This Friday was the first Friday of Lent. For us good Roman Catholics (What? Why are you laughing?), that means no meat on Fridays from now until Easter on March 22nd. Incidentally, my family gives up meat on Wednesdays also -- but this isn't a rule of Lent -- it's just kinda something we do. But I digress...

We end up eating a couple of standby dishes during Lent including Tuna Noodle Casserole (oh-so-good), pizza, and grilled cheese with tomato soup. So in honor of this first Friday (and inspired by my bread baking desires), I decided to make my own pizza crust.

A couple of weeks ago, I saw an episode of Julia Child: Lessons With Master Chefs featuring Roberto Donna. This is what actually inspired all this bread baking nonsense to being with. He was making pizza, among other things. I'd have really liked to have made his dough, but I had to work on Friday and he was doing stuff every two hours for several hours, which would have meant pizza at around midnight. Then I found a Cook's Illustrated recipe for a 75 minute pizza dough. I was a bit wary of this recipe though, because I didn't think it'd have much flavor, so instead, I made a biga Thursday night with regular old Fleischman's yeast (not rapid rise), water, and flour. This idea was actually inspired by yet another Cook's Illustrated recipe I almost followed for an Italian bread. Basically, I added half the flour and water to a bowl with the yeast. I set it out overnight, covered lightly. In the morning, it was bubbly and stuff and I put it in the frigo. When I came home from work at about 6:30PM, I pulled it out and added the rest of the flour and water. I kneaded AND mixed completely by hand (I think I'm giving up on my mixer -- I thought it would burst into flames when I made those rolls) and then allowed the dough to rise in a warmed-but-not-on oven (this is why I didn't worry about my biga being cold).

In the mean time, I went to the grocery store and picked up some Muir Glen organic whole peeled tomatoes, some fresh basil, processed mozzarella (actually this was recommended by Donna!), and I could swear I bought something else. The total was about $12, but I bought two cans of tomatoes, not knowing how much I'd need. Anyway, again I digress.

I seeded the tomatoes and put them in a bowl. I tore in about 5-6 large basil leaves and added one minced garlic clove. I added a drop of olive oil (maybe 1 tbsp) and some salt and pepper. I threw in a pinch of red pepper flakes, though I think maybe I should have left them out or added a bit more -- I didn't even taste 'em. I crushed the tomatoes by hand and let this raw sauce marinate.


As you can see, there's still a lot of liquid left in the sauce. Next time, I might set the tomatoes over a strainer. But don't worry -- I'm saving the juice. I'll probably use it for a cooked tomato sauce.

Next, I turned out the dough (which had risen BEAUTIFULLY) and beat it down a little. I then cut it into four pieces with my bench scraper and rolled each into a ball. By this time, I had the oven going as hot as it could with my stone in there. It's winter and between the dry air and the oven, I was afraid my dough balls would skin over. So I covered them with a dish towel and misted it with water every so often. I really got it pretty damp, with no adverse effects whatsoever.

I stretched my dough the way Donna did on Julia's show. I was alone, so I don't have pictures, but I'll try to explain (but also, I think you can watch the video on the website linked above). First, I flattened the dough a bit with my whole hand. Then, with all of my fingertips, I gently jabbed into the dough disc down its center towards my body, then came up around the outside of the circle back to the "top" or furthest point from my body. I repeated this and then flipped and rotated the dough. I did this a couple of times until I thought it wasn't doing anything anymore, and started gently stretching the dough. I held the center down with one hand and lightly tugged on the perimeter. Once the dough had stretched a bit, I picked it up and stretched it gently over my fists. I had a problem where the center got too thin (I could literally see through it, but it never broke), so I tried to really just work the edges and let the center catch up on its own. This is a skill I need to practice. I was so happy because my dough didn't shrink when I put it down. This alone was a huge success.

I topped the pizzas with very little sauce, although there was still too much moisture in general. Here's my first pizza -- just sauce and cheese.


My pizza peel hasn't come in from King Arthur yet, so I worked on parchment on an upside down half sheet pan. It worked great, and the parchment can go right on the stone in the oven. (However, this might have prevented the stone from doing its best work -- I'm not sure if the parchment formed a moisture barrier. My crusts got soggy really quickly after coming out of the oven.) It's also super easy to pull the pizza out -- just grab a corner of parchment and slide onto the sheet pan. I thought this pizza was beautiful. It's a little pale, but I'm okay with that. In fact, I kind of prefer a more medium-rare pizza to a well done one. But I did want to taste the differences and get a truly magnificent pie, so I tried a couple of ways to brown it up more.


Here's a cross section of a slice from my first pie. I like the thicker crust a lot. Notice the nice holes. It was a really flavorful crust -- I think because of my overnight fermentation.


This is just that first pie cut up.


Here's what the bottom of the first slice looked like. Not bad, but not crackery-crisp.


Here's my second pie -- unbaked, obviously. This one is just tomato, basil, olive oil, mozzarella, and salt and pepper. It was my favorite, even with the sub-par tomatoes one finds at the market in February on Long Island.

I let this one cook a little longer and was happy about the results. It was still a bit pale though.


At my brother's request, I made a white pie. This one has olive oil, salt, pepper, a pinch of oregano, mozzarella, peccorino, and ricotta. It was divine. My brother's favorite.

I decided my oven was not hot enough. But it was already at the max. I had been letting the oven have about 10 minutes to reheat after each pizza. Maybe this isn't enough, I don't know. But in an effort to make everything a bit hotter (and browner), I put the pizza in the oven on "bake", then closed the door and turned on the broiler. This moves the flame from the bottom of the oven to the top and also keeps the flame on constantly, rather than cycling on and off (which I think it was doing, despite being at max temp). The stone and pizza were in the bottom third of the oven, so I wasn't too worried that the pizza would burn from the broiler. I think the was a good move, although I might just turn the broiler on for the second half of baking. By the way, the cook time for these was about 8 minutes.


Here's my last pizza. This one has mozzarella, sauce, peccorino, and a tiny bit of ricotta. This was the prettiest pie, and pretty damn tasty too.

I think I'm going to work on these pizzas again this Friday. They were really delicious -- I don't have any complaints. But I think I can make them better. Not too shabby for my first attempts though.

Tuesday, February 12, 2008

Best Pancakes Ever!

On Superbowl Sunday, my mother decided she wanted to follow a recipe for cole slaw that required buttermilk. Not wanting to throw the remainder away like we usually do, she asked me to come up with some use for the 3/4 of a quart of buttermilk. Now, I don't know about you, but when I hear buttermilk, I think...PANCAKES!

I've kind of been craving pancakes lately. I don't really know why. It might actually have been a maple syrup craving because waffles sounded great too, but no need to over-analyze...wait, that's what I do best -- over-analyze. How'm'I doin'?

I decided to check out Cook's Illustrated's website for a suitable recipe. I also looked for buttermilk biscuits, but I'm way too lazy for that. I found a really simple recipe.

It required:


1 EGG WHITE! Whipped to soft peaks. I did it by hand cuz I was too lazy to go downstairs and lug up the KitchenAid. Which is funny because it would have been a lot faster with the mixer, even counting transport and cleaning. Also, today is Tuesday. I made these pancakes Saturday morning. My arm still hurts. I need to work on my prolonged whisking skills.


I gently folded (why isn't it feld?) my egg white into a mixture of buttermilk, 1 egg yolk, some flour, some baking powder, sugar, and melted butter. I also threw in a pinch of cinnamon and wished I'd actually used my vanilla sugar. See how nice a folding job I did?


Now, I don't give my brother credit for much, but Dolores does make some fine pancakes. He uses Bisquik, and I don't actually have any problem with that. But Bisquik doesn't use buttermilk, so...yeah. But I think I know why I like my brother's pancakes so much...GREASE! My recipe said to lightly oil a griddle. Heh. I added a couple of tablespoons of vegetable oil to my nonstick skillet. My pancake got a really delicious, greasy crust of golden-brown awesome-ness. Pour on the Aunt Jemimah!


Here's a cross-section of my magical pancake. It's a lousy photo, but I think you can see the fluffiness and airiness and other lightness synonyms. Yeah, synonyms. Funny cuz there was cinnamon in the pancakes. Oh, and I'm serious about the Aunt Jemimah. Actually, it was AJ lite. I actually hate real maple syrup, but pretend to love it when I'm in Vermont.
Posted by Picasa

Wednesday, February 06, 2008

Sourdough Starter: Day 10

Finally the starter is done fermenting. Day 10 involves removing the grapes, throwing away most of the culture, and then feeding the rest with flour and water. That's just what I did today.


I started by removing the grapes and really squeezing them out into the starter. I was able to extract a lot of liquid from them. I was surprised when I opened the sack of grapes -- some looked just like grapes, others looked like rot. Curious, I thought.


Then, I mixed the culture really well with my hands. I wanted to make sure I got everything off the bottom.


It took a couple of minutes, but wasn't a big deal, really. When everything was mixed, the consistency was kind of like milk. Perhaps you can tell from the photos...

I then poured off 1 lb 2 oz of culture. Silverton says to throw the rest away.
I saved a small container for backup. I popped that in the deep freeze with a note that says "Do Not Throw Away". Hopefully I never need it, but if I do, it'll be there waiting for me. It's probably a good idea to stash away a little every few months.


I washed and dried my culture bowl, then added the small amount of culture back to it. Then I added warm water (78F) and flour and again mixed with my hands. Many of the lumps didn't break up, despite my best efforts. I really tried to squeeze the little pearls of flour, but there were just too many! This mixture was thicker than the previous culture, and not even all the flour dissolved. This was more like heavy cream.


The smell is still horrific. The family is describing it as cheese, but I'm smelling vinaigre. Hopefully now that the grapes are out, it won't be so vile. Although, I did smell the grapes closely and they smelled like.....grapes! I wanted to eat one. I have to keep feeding until day 14. I'm supposed to feed thrice daily, but I don't see that happening. I am supposed to wait 4-6 hours between feedings, but I'm not getting up in the middle of the night. I'll feed twice probably -- before and after work. And on the weekend, I'll try to do it three times. But I might skip ahead and bake bread on Friday, especially if my supplies arrive in the mail. Oh yeah, I dropped $200 on supplies (including a $100 thermometer -- of my own choosing). This bread better be great.

Tuesday, February 05, 2008

Sourdough Starter: Day 09

I've been slow to post about the starter lately. That's because there's nothing going on. It just sits on my counter and stinks. Here are a few photos from tonight of what it currently looks like. I smell nothing yeasty per se, although I do smell fermenting grapes when I mix everything up. Notice the two phases. I flip the bag of grapes over each day when I stir it up. Tomorrow I begin feeding this beast.


Superbowl 2008: Pulled Pork on Homemade Rolls

Every American knows what the Superbowl is really all about: food. Really tasty, not-very-good-for-you food. I decided I was going to make pulled pork and homemade sandwich rolls from the La Brea bread book.

My pork recipe came from Gourmet Magazine originally (here's a copy), but I wanted to do a barbcue-style pulled pork, so I adapted the recipe by adding in some smoked paprika (or pimenton), some chili powder, and one habanero. I slow-roasted a pork shoulder for hours and hours on Saturday because I'd need the oven Sunday for rolls and other tasty treats.

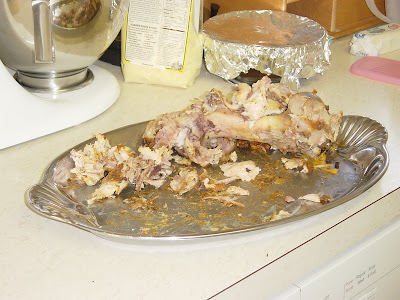
I chilled the pork and its drippings overnight. Here's a photo of the pork after it was chilled. You might see that it has been disturbed -- that is from Tackle Box and me pulling off the skin and a few morsels of marbled meat. It was amazing. But I could feel my arteries clog. But who cares.

Before shredding:


After shredding:


Here are the drippings from the meat that I refrigerated overnight. I didn't add anything to the pan itself but a little water.


I scraped the brown gelatinous layer off and melted it in a pot. Into that, I shredded the pork and added some barbecue sauce. I cheated and used K.C. Masterpiece. I felt like a sellout. But the pork was phenomenal. I think I'll use the fat for some hash browns.

I started working on my sesame semolina sandwich rolls at about 8AM Sunday morning. I calculated that they'd need about 5 hours and wanted them done way before 4:30PM when my dad had to go to work. I combined my flours (12.5 oz white bread, 14 oz semolina, 10 oz durum), water (5.5 oz at 70F), starter (6 oz; yes, even though it's not done yet), and yeast (0.5 tsp). I was supposed to use packed fresh yeast, but Silverton says early in the book that you can substitute dried yeast, but to use about half as much as a recipe says because fresh yeast is more than just yeast. I put this mess in my Kitchen Aid mixer and turned it to stir. I stirred and stirred, but it was really just a powdery disaster. This dough wasn't going to come together. So I added more 70F water -- maybe 1/2 cup more, which I thought was quite a lot. I was petrified of adding too much liquid, so it took me 10 minutes to get the dough to come together. Then I added the salt. Silverton says to mix on medium, but I don't think my mixer had it in him (or her?). I had it on stir and the mixer was struggling -- it was getting hot and I smelled a burning smell. Retrospectively, maybe it needed a bit more water, but I was afraid. Silverton says to knead until the dough reaches 74F, but this wasn't happening. I gave up and shut down the mixer. I put the dough in an oiled bowl and allowed it to ferment for at least 2 hours. It was supposed to double in volume -- it didn't.

Here's the before and after. They look oddly similar, don't they? It only rose a little.


Then I shaped the dough into rolls and allowed them to proof. They really didn't. So I baked them.

Needless to say, these rolls were sub-par. They were quite dry and chewy -- gave my jaw quite a workout -- but I think they looked damn good. They needed more salt, but maybe if my starter was ready, they'd have more flavor. I really need to be patient. I shouldn't have any deadline whatsoever. I have to remember that when I make my first real loaf.


The pork was great and the rolls weren't bad. When all was said and done, I only ate half of a pulled pork sandwich. Here's a list of what I served at my Superbowl party:

Friday, February 01, 2008

Sourdough Starter: Day 05

This project has now been going for five days and things are still pretty funky. The slurry that is my culture separates into a liquid phase and a goo phase. The liquid is sort of brownish-purple, but transparent and only lightly tinted. The smell: putrid. It is horrible. But, since I'm keeping it tightly sealed with plastic wrap, it really only stinks when you open it or come really close.

Here's a pic of Tackle Box tasting it.


He nearly refused to try it, but I assured him it doesn't taste nearly as bad as it smells, and in the end, he agreed. There's not really any activity -- no bubbling or anything. It's just rotting.